
在CentOS的VPS下安装OpenVPN
 2010-03-25 | 浏览人数: 54,343次 | 分类:

上次介绍了在CentOS下安装PPTP的VPN的方法,由于PPTP对环境的要求很高,大多数的VPS都是基于OpenVZ虚拟化技术的,所以无法安装。
这回介绍另一种VPN——OpenVPN,能在绝大多数VPS上安装,而且功能更加强大,比如能穿透中国移动的cmwap代理实现cmnet的功能等等。
不过OpenVPN有一个致命缺点,就是绝大多数移动设备不支持,电脑上使用需要安装复杂的客户端。
网上有很多的教程,但大都不适合VPS或者不完善,我根据我自己安装的经验,记录下来以便查阅。
以下所有命令我都加了下划线,即加下划线的一定是在类似[root@vps ~]#的提示符下输入。
SSH登陆VPS,我的系统是32的CentOS 5.4,如果用别的Linux发行版也差不多,有些命令需要修改下就是了。
OpenVPN需要TUN支持,大多数VPS默认都没有开启,你可以用这个命令检测:cat /dev/net/tun
如果返回信息为:cat: /dev/net/tun: File descriptor in bad state 说明正常,否则发个ticket给VPS公司让他们帮忙开吧。
另外如果你需要连上OpenVPN后能访问互联网,还需要iptables_nat模块支持,用这个命令检测:iptables -t nat -A POSTROUTING -s 10.8.0.0/24 -o venet0 -j MASQUERADE
如果返回信息为:iptables: Unknown error 4294967295 说明正常,否则同样需要发个ticket让VPS公司帮忙开通。
环境准备好之后,我们正式开始安装OpenVPN了。网上的教程绝大多数都是用源代码编译方式安装的,但我觉得这种方式不便于以后升级维护,这里我们使用yum来安装。
默认情况下centos的yum源没有OpenVPN的,先安装EPEL这个东西,使用命令:rpm -Uvh http://download.fedora.redhat.com/pub/epel/5/i386/epel-release-5-3.noarch.rpm
成功后yum源里面就有OpenVPN了,直接使用命令yum -y install openvpn
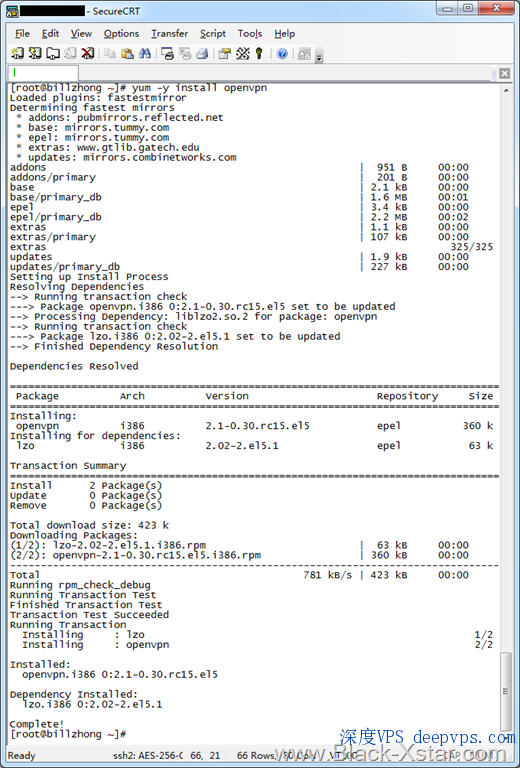
这里就体现了yum安装的好处,比如OpenVPN需要lzo支持,安装的时候会检测系统,没有的组件会自动安装进去。
我们来找一下安装到哪去了,使用命令:locate easy-rsa
找出来了原来在这里:/usr/share/openvpn/easy-rsa 大家应该都是一样的。
我们把easy-rsa这个文件夹移出来,用命令:cp -R /usr/share/openvpn/easy-rsa /etc/openvpn/
然后cd /etc/openvpn/easy-rsa/2.0进入,生成OpenVPN需要的证书。
用vi vars来编辑环境变量,这里涉及到编辑器vi的用法,不会用就自己google一下。
把最后几行根据实际情况修改:
export KEY_COUNTRY=”CN”
export KEY_PROVINCE=”GD”
export KEY_CITY=”GZ”
export KEY_ORG=”Black-Xstar Net Empire”
export KEY_EMAIL=”webmaster [at] black-xstar.com”
保存后运行. vars设置生效。
接下来运行./build-ca server创建证书颁发机构。
Generating a 1024 bit RSA private key
……………………++++++
….++++++
writing new private key to ‘ca.key’
—–
You are about to be asked to enter information that will be incorporated
into your certificate request.
What you are about to enter is what is called a Distinguished Name or a DN.
There are quite a few fields but you can leave some blank
For some fields there will be a default value,
If you enter ‘.’, the field will be left blank.
—–
Country Name (2 letter code) [CN]:回车
State or Province Name (full name) [GD]:回车
Locality Name (eg, city) [GZ]:回车
Organization Name (eg, company) [Black-Xstar Net Empire]:回车
Organizational Unit Name (eg, section) []:回车
Common Name (eg, your name or your server’s hostname) [Black-Xstar Net Empire CA]:回车
Name []:回车
Email Address [webmaster@black-xstar.com]:回车
注意红色的地方,需要按回车的。
创建CA之后来生成服务器证书,输入./build-key-server server
Generating a 1024 bit RSA private key
…++++++
……………++++++
writing new private key to ’server.key’
—–
You are about to be asked to enter information that will be incorporated
into your certificate request.
What you are about to enter is what is called a Distinguished Name or a DN.
There are quite a few fields but you can leave some blank
For some fields there will be a default value,
If you enter ‘.’, the field will be left blank.
—–
Country Name (2 letter code) [CN]:回车
State or Province Name (full name) [GD]:回车
Locality Name (eg, city) [GZ]:回车
Organization Name (eg, company) [Black-Xstar Net Empire]:回车
Organizational Unit Name (eg, section) []:回车
Common Name (eg, your name or your server’s hostname) [server]:回车
Name []:回车
Email Address [webmaster@black-xstar.com]:回车Please enter the following ‘extra’ attributes
to be sent with your certificate request
A challenge password []:回车
An optional company name []:回车
Using configuration from /etc/openvpn/easy-rsa/2.0/openssl.cnf
Check that the request matches the signature
Signature ok
The Subject’s Distinguished Name is as follows
countryName RINTABLE:’CN’
stateOrProvinceName RINTABLE:’GD’
localityName RINTABLE:’GZ’
organizationName RINTABLE:’Black-Xstar Net Empire’
commonName RINTABLE:’server’
emailAddress :IA5STRING:’webmaster@black-xstar.com’
Certificate is to be certified until Nov 18 17:25:15 2019 GMT (3650 days)
Sign the certificate? [y/n]:y1 out of 1 certificate requests certified, commit? [y/n]y
Write out database with 1 new entries
Data Base Updated
同样注意红色字的部分,是需要人工输入的。
服务器证书生成完了,我们来生成客户端证书,理论上每个OpenVPN用户都有独立的证书,我们先来生成一个试试。
输入命令:./build-key client1,这里的client1是客户端名称,如果第二个就是client2了。
Generating a 1024 bit RSA private key
…….++++++
………++++++
writing new private key to ‘client1.key’
—–
You are about to be asked to enter information that will be incorporated
into your certificate request.
What you are about to enter is what is called a Distinguished Name or a DN.
There are quite a few fields but you can leave some blank
For some fields there will be a default value,
If you enter ‘.’, the field will be left blank.
—–
Country Name (2 letter code) [CN]:回车
State or Province Name (full name) [GD]:回车
Locality Name (eg, city) [GZ]:回车
Organization Name (eg, company) [Black-Xstar Net Empire]:回车
Organizational Unit Name (eg, section) []:回车
Common Name (eg, your name or your server’s hostname) [client1]:回车
Name []:回车
Email Address [webmaster@black-xstar.com]:回车Please enter the following ‘extra’ attributes
to be sent with your certificate request
A challenge password []:回车
An optional company name []:回车
Using configuration from /etc/openvpn/easy-rsa/2.0/openssl.cnf
Check that the request matches the signature
Signature ok
The Subject’s Distinguished Name is as follows
countryName RINTABLE:’CN’
stateOrProvinceName RINTABLE:’GD’
localityName RINTABLE:’GZ’
organizationName RINTABLE:’Black-Xstar Net Empire’
commonName RINTABLE:’client1′
emailAddress :IA5STRING:’webmaster@black-xstar.com’
Certificate is to be certified until Nov 18 17:31:21 2019 GMT (3650 days)
Sign the certificate? [y/n]:y1 out of 1 certificate requests certified, commit? [y/n]y
Write out database with 1 new entries
Data Base Updated
注意红色字的部分,和上面生成服务器证书差不多。
最后生成Diffie Hellman参数:./build-dh,这个需要一点时间的。
完成上面的过程后,把/etc/openvpn/2.0/keys里面的东西下载回来。
接下来我们开始配置OpenVPN了,我的配置文件只是一个参考,可以根据实际情况修改。
首先cd ..回到上一级目录,然后vi server.conf新建一个配置文件,输入下面内容:
port 443
proto tcp
dev tun
ca /etc/openvpn/easy-rsa/2.0/keys/ca.crt
cert /etc/openvpn/easy-rsa/2.0/keys/server.crt
key /etc/openvpn/easy-rsa/2.0/keys/server.key
dh /etc/openvpn/easy-rsa/2.0/keys/dh1024.pem
server 10.8.0.0 255.255.255.0
push “redirect-gateway def1″
push “dhcp-option DNS 208.67.222.222″
push “dhcp-option DNS 208.67.220.220″
client-to-client
keepalive 10 120
comp-lzo
persist-key
persist-tun
verb 3
其中DNS服务器地址可以换成主机商的,也可以和我一样用opendns。另外我有了tcp协议和443端口,是为了方便我在cmwap下使用,也可以换别的。
到这里为止OpenVPN就配置好了,接下来我们设置外网访问。
输入vi /etc/sysctl.conf开始编辑,找到net.ipv4.ip_forward = 0改成net.ipv4.ip_forward = 1保存。然后执行sysctl -p这个命令。
输入iptables -t nat -A POSTROUTING -s 10.8.0.0/24 -j SNAT –to-source 1.2.3.4添加规则,注意最后1.2.3.4改成你的VPS的IP地址。
完成后用/etc/init.d/iptables save保存iptables设置,然后/etc/init.d/iptables restart重新启动下。
把OpenVPN添加到开机启动,用vi /etc/rc.local进入编辑,在后面加入/usr/sbin/openvpn –config /etc/openvpn/server.conf &这一行。
需要在服务器上完成的操作到这里就结束了,输入openvpn –config /etc/openvpn/server.conf &启动。
和PPTP不一样,OpenVPN需要安装客户端才行,在http://www.openvpn.net/index.php/open-source/downloads.html下载最新版本的Windows Installer安装。
然后在下载回来keys文件夹里面找到ca.crt、client1.crt和client1.key这三个文件,放到C:Program FilesOpenVPNconfig里面。
同时在这里面新建一个名字为“client1.ovpn”的文本文件,输入下面内容:
client
dev tun
proto tcp
remote 1.2.3.4 443
resolv-retry infinite
nobind
persist-key
persist-tun
ca ca.crt
cert client1.crt
key client1.key
ns-cert-type server
comp-lzo
verb 3
把第四行的1.2.3.4换成VPS的IP地址,然后保存。
在开始菜单里面找到OpenVPN GUI并运行,Vista和Win7下需要管理员身份运行。点Connect后等一下,是不是成功连上去了?
转载自:http://www.black-xstar.com/blog/
[复制本文链接发送给您的好友]


共有8条评论 [点此发言]